How to Roll a Perfect Joint, Blunt or Backwood for Smoking

When it comes to smoking weed there is nothing more closely associated with the experience than a nice blunt or joint. But not all joints are rolled equally and the difference between the good and the bad is cavernous.
Frankly, if you want the best smoking experience, then you need to learn how to roll one up in a jiff. In this guide, we look at how to roll joints, blunts and Backwoods.
That said, read on for a guide that will help you to partake better than ever before.
Rolling 101: Joints vs Blunts
First things first let’s go over the differences between joints and blunts. Though similar in most fundamental ways they do differ in several departments that can have a significant impact on your overall user experience. That in mind read on for a blunt versus joint comparison
Joint vs Blunts
When it comes to the matter of joints versus blunts there are several things that you need to keep in mind. For one thing, joints tend to be smaller in size than blunts. The comparison is a little like that of a cigarette to a small cigar.
Blunts also tend to be substantially harsher than joints. This is because they are wrapped in tobacco leaves. As a result, blunts will probably make you cough more if you are not well acquainted with them.
However, blunts do have the upper-hand where discretion is needed. If you want to avoid smelling like marijuana you may benefit from the less straightforward smell profile of the blunt. Because the smoke is tweaked with a hint of tobacco the smell is somewhat ambiguous. You won’t smell like a rose garden but it is better than nothing.
What You Need Before Rolling
What you need before rolling will depend somewhat on whether you are trying to make a joint or a blunt.
In either case, you will need the medium (either rolling paper or cigarillos respectively) and some cannabis. When rolling joints you can get away with .4 grams. In the case of a blunt you will need a little bit more (around .6- 1 full gram).
Additionally, if you are rolling a blunt with a cigarillo rather than a blunt wrap you will need a small knife to cut and gut the cigar. Some may also like to keep a roller handy to make the work ahead a little bit easier.
Grinding Weed to a Specific Coarseness
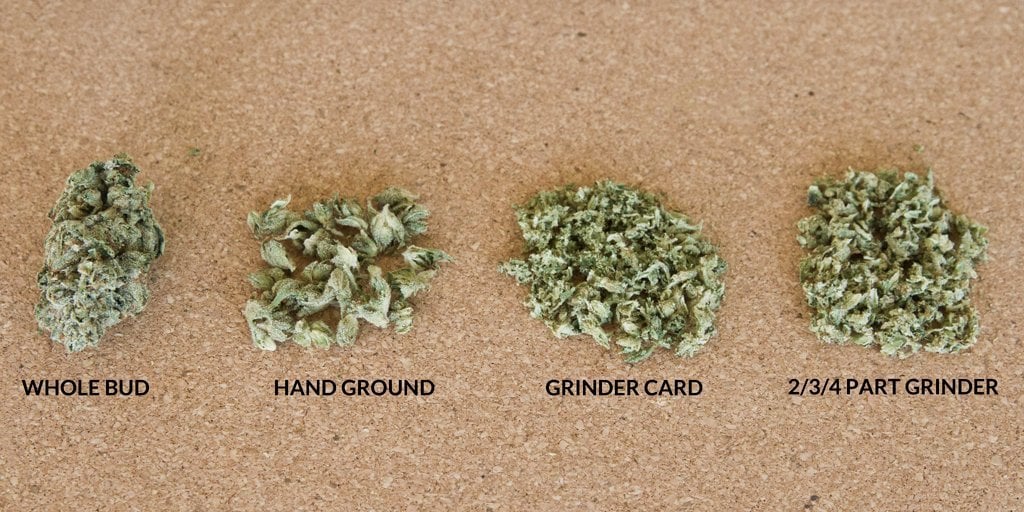
Before you can start doing any rolling, you will need to grind the bud so that it burns smoothly.
Grinding bud is more an art than it is a science. Too coarse and the weed will burn slow and unevenly. Too fine and the flames will devour it before you get the chance to enjoy your smoke.
A more moderate consistency will be much more to your liking. To grind marijuana to perfection most people prefer to use a grinder. However, you can use your fingers to break up the bud when you are in a pinch.
Types of Rolling Papers
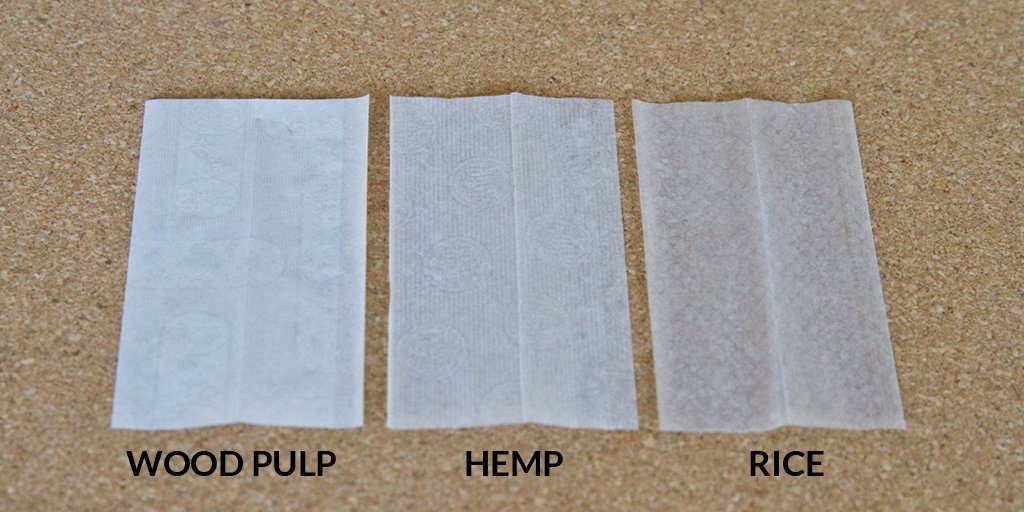
There is a surprising amount of variety when it comes or selecting your paper. The three primary options are wood pulp, rice and hemp.
Wood pulp is your standard cigarette paper, rice is extremely thin and burns quickly, whereas hemp has a few durable varieties that typically burn longer and has become increasingly popular since the legalization movement.
Joint Roller
A joint roller is a simple tool that essentially performs in the exact manner that the name suggests. It’s designed to make it as easy as possible for you to get a nice clean roll.
You definitely don’t need a joint roller if you don’t want one, but they do make the job easier and you can pick them up on the cheap at most gas stations.
How to Roll a Joint
Now that we’ve introduced the topic thoroughly, let’s take a close look at how to roll a joint. But without any further ado, let’s welcome Wiz Khalifa as he show us how to roll the perfect joint.
Step 1: Acquire the Paper
First things first, you are going to need to get yourself some paper. The good news is that you can get joint papers at just about any local convenience store, head shop, tobacco store or online on Amazon.
There are lots of different shapes, styles and materials, but it is ultimately a pretty low stakes decision. No matter what, the paper you choose will get the job done, but, personally, I’d go unrefined organic hemp paper a.k.a RAWS.
Step 2: The Filter
You’ll also need a filter to make the smoke a little bit less harsh. You can purchase filters at the same places that you get your paper or make them easily enough with a few things that you probably already have on hand.
Most filters, or crutches as they are called when you have to improvise, are just made out of stiff paper or cardboard. You can use envelope paper, index cards, or anything else that is firm enough to the end of the joint firm and structurally intact.
Then make a decent small crutch by simply rolling up your selected material so that it makes a cylinder shape that will fit nicely in the end of your joint.
You can also roll a good crutch by folding the paper in an accordion style. The idea is to make the fold tight enough to stay rolled but not so tight that you will have a hard time taking a good drag from the eventual joint that ensues.
Now that you know how to roll a filter, it’s time to get right into the thick of it.
Step 3: Make a Paper Boat
Now it’s time to do what the connoisseurs call, making a boat. The paper should come out of the box semi folded. Simply crease the paper along the pre-folded line to create a more distinct boat style shape.
Then twist one end of the joint paper. This will be the front of your joint, and by twisting it, you’ll be sure that none of your cannabis will fall out once it is placed in the paper.
Step 4: Grind Your Bud
Now comes time to grind the bud. You can use your fingers to perform this next step but it is usually best that you use a grinder for the best consistent results.
Remember not to over grind. Grinding the bud up too much will leave you with a joint that is un-smokable because there will be no airflow.
Step 5: Fill the Joint Up & Add Filter
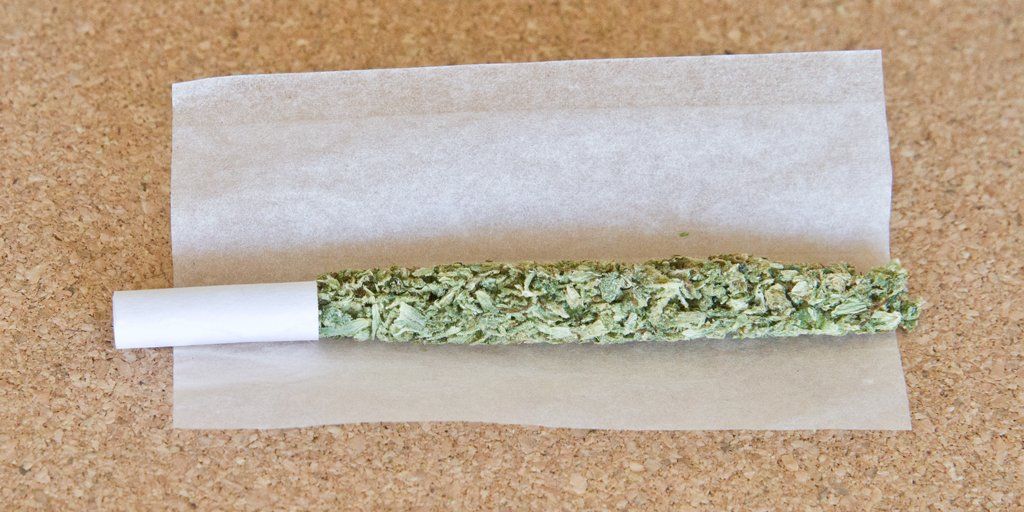
Next, it is time to fill up the joint paper with your cannabis and filter. Carefully place your filter at the opposite end of the twist and add the grounded up bud in the middle of the boat, mindful that you don’t spill it.
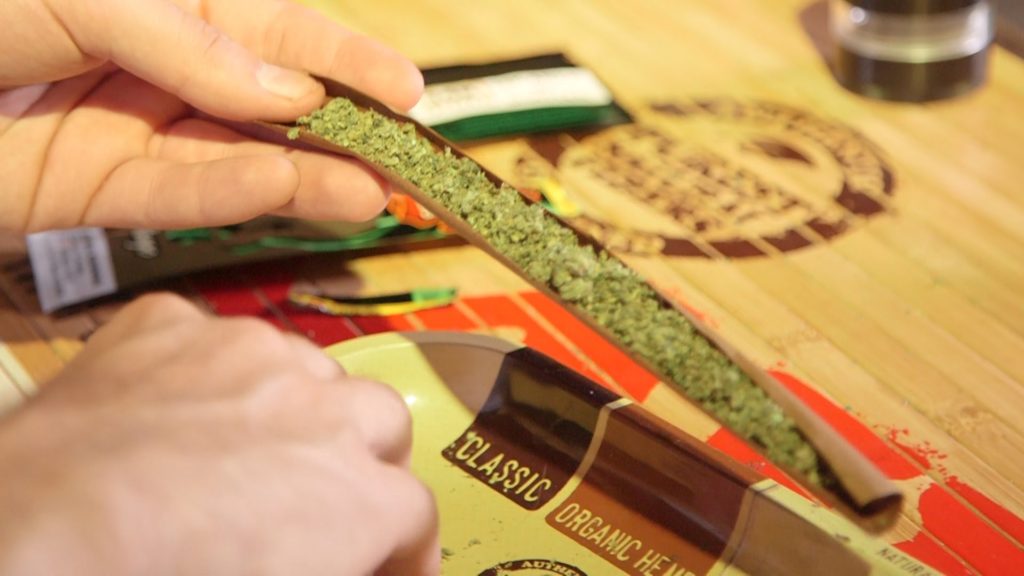
Step 6: Roll Your Boat
Now that the joint is packed, it’s time to tuck the paper in. To do this, you essentially pinch the straight edges of the paper and roll them together. You will then want to roll the paper all the way up to the very end, and then lick the top the same way you would an envelope to seal it.
Step 7: Smoke it!

Now for the best part. Light the end that has been sealed with the twist, then prime it by rapidly puffing the filtered end to burn off the excess paper. After that, you should have no trouble figuring out what comes next. After all, it’s not that hard to figure out how to smoke a joint!
How to Roll Cone Joints
That’s all well and good, but you may now be wondering how to roll a cone joint. The cone joint is quite similar to what we just described but there is one main thing you need to know before rolling a cone joint.
When rolling a cone joint, the technique starts with adding the weed and filter into the paper boat from the very beginning. When doing this, you’ll put a small amount of bud near the filter and add more as you move closer to the front tip of the joint. You’ll need to angle the joint paper at a 45-degree angle to give it the signature cone look.
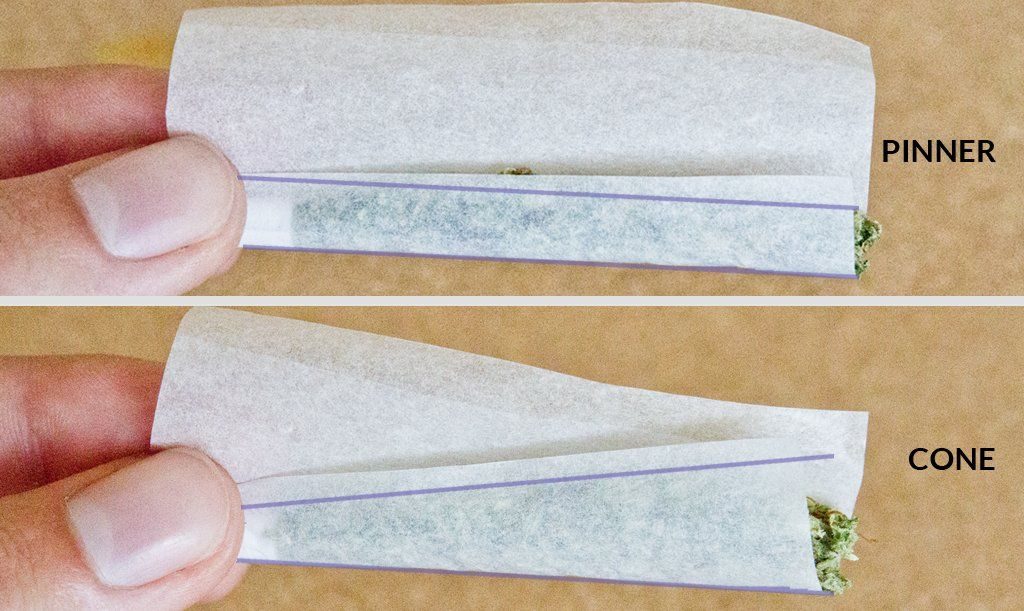
From there, lick, tuck, seal and smoke!
If you’re looking to smoke cone joints without the trouble of rolling them, then you can find paper cones available at the same place you buy wraps or papers.
How to Roll Specialty Joints
Now that you’ve gotten the basics down, I know you want to learn how to roll up a few specialty joints.
There is a shotgun-style joint. To roll this you take two smaller joints, then bind them together with a larger piece of paper so that the two joints look a little like the barrels of a shotgun.
There is the infamous cross joint. This option is a bit of a novelty experience but it’s also great fun. Start by making two joints, one long and fat, the other short and thing. Cut a hole in the middle of the long and fat joint that is big enough to slide the thinner option through the hole.
You also poker a smaller hole in the middle of the thinner joint so that you can draw from both in a single inhale.
You then combine the joints and manipulate the paper so that it is fully sealed. Some people like to load separate joints with different strains of cannabis for extra fun.
How to Roll a Blunt
Now it’s time to learn how to roll a blunt. Let’s get right down to it, shall we?
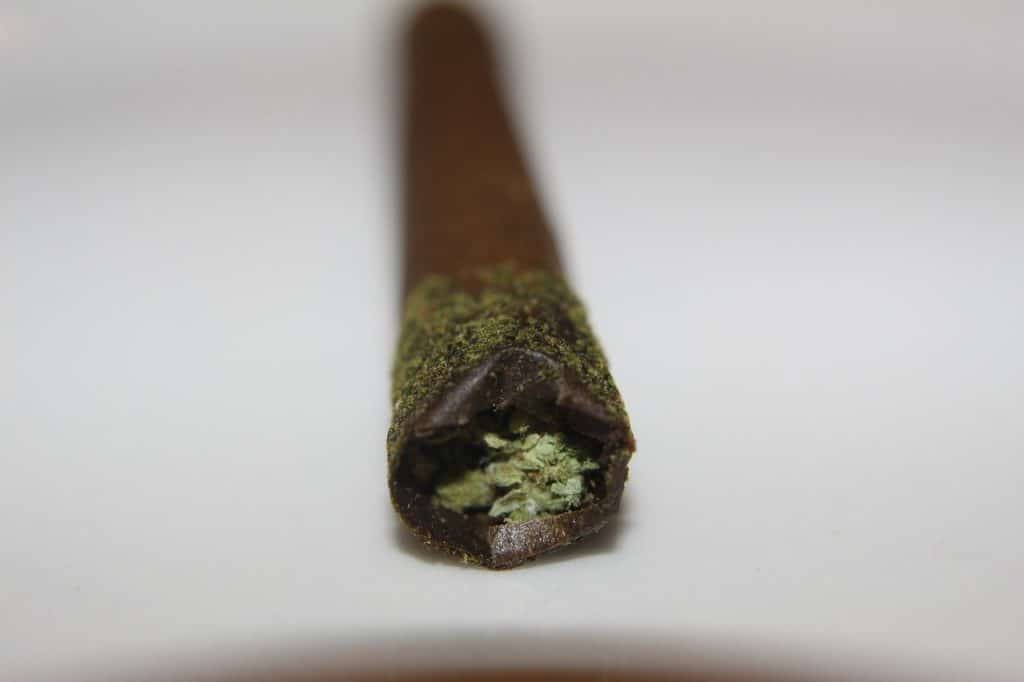
Step 1: Choose Your Favorite Wrap
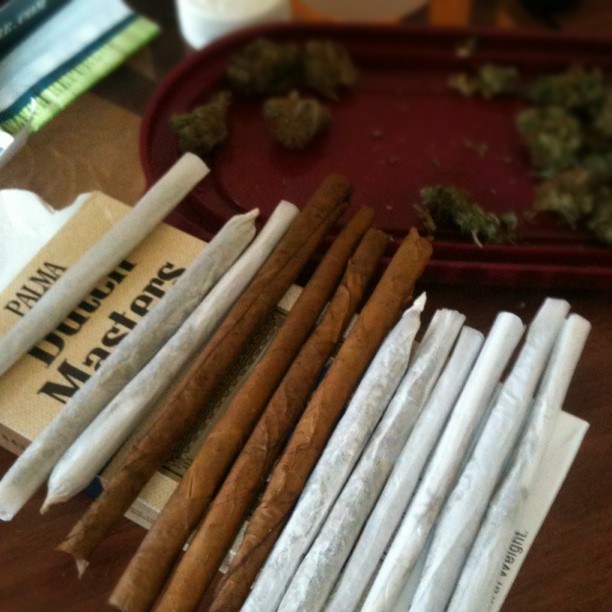
You can buy cigars, cigarillos or blunt wraps at the same place you buy joint papers. Typically, you’ll find a number of different brands ranging from Swisher Sweets, White Owls, Splitrillos, Dutch Masters, King Palms and many others.
No matter if you go with classic OG flavor or buy a blueberry swisher, there will surely be one that you like and enjoy.
Step 2: Gut the Wrap
Now, we need to remove the tobacco from the cigarillo wrap. The best way to do start this is by pinching each side of the wrap with equal pressure. Pinch, tear and slide all the way down the wrap as you continue to use equal pressure on each side. This method requires a level of skill, but it will give your wrap a clean, straight end.
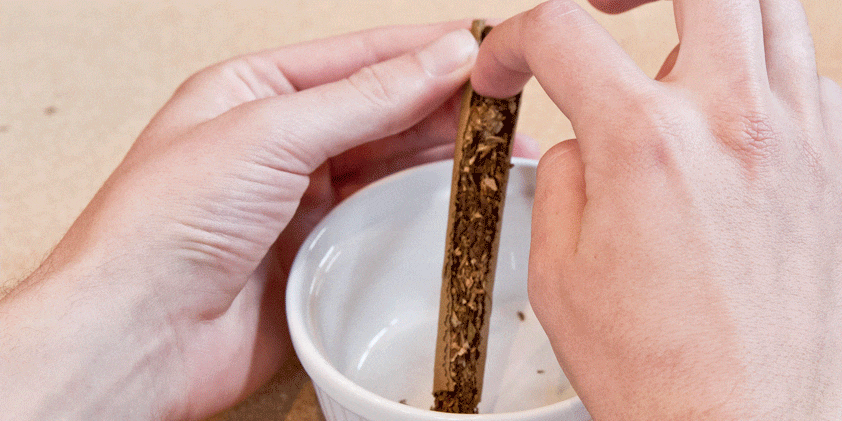
If you don’t think you can use your fingers, there is an easier way to split a wrap. You can cut a straight line down the center of the cigar down the middle so that you can remove the tobacco and replace it with cannabis. Cut carefully lengthwise across the cigar with a small Exacto knife. You want to keep the cigar paper as intact as possible.
It will be easiest to accomplish this with an extremely sharp tip. When the cigar has been sliced open carefully remove all of the tobacco.
If you’re going to be smoking a lot of blunts, you may want to invest in a specific tool designed to cut blunt husks for easy extraction. It’s called EZ Splitz.
Step 3: Grind the Bud
You know the drill at this point, right? Grind up the bud so that it matches your desired coarseness.
Step 4: Load it Up
Next up, load up the blunt with cannabis. Blunts usually require between .5-1 gram of cannabis to be filled up. The idea is to keep it rolled tightly, but also not so tight that the blunt is hard to draw from.
Step 5: Roll It
Now it comes time to roll the blunt. Once again you will want to pinch along the severed ends of the blunt gently rolling so that it is neither too tight or too loose. You can then like the pinched ends to formally seal them. And that is that. You’ve now learned how to roll the perfect blunt!
Step 6: Smoke it up!

Now that you’ve done all the hard work, it’s time to reward yourself. Sit back, get your lighter out and spark up.
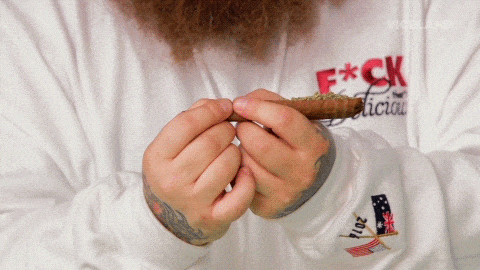
How to Smoke a Blunt
If you’re asking this question, let me give it to simply. This part is the easiest and most joyful part of the whole blunt smoking experience.
First, prime the tip by inhaling. Then make sure that the end is completing lit and has a red hot cherry. Sit back, puff along and enjoy the ride.
How to Roll an Extra Long Blunt (Extendos)
Extendos are basically just two blunts combined making it extra-extra long. It’s a lot of weed, but hey sometimes that is exactly what the doctor ordered. Most of the steps are exactly the same. Gut both cigars, and layout the wraps in a continuous line so that they build off one another lengthwise.
You can then unit the two wrappers by tucking and wetting the paper so that it syncs up evenly. Then do exactly as you would when rolling a blunt. Start at one end and work your way down to the other.
How to Roll a Backwood
Backwoods are essentially the same thing as a blunt, however, Backwoods are a bit harder to roll because the wrap is like a large tobacco leaf, flexible not stiff like a cigarillo wrap.
We will explain the process of how to roll a Backwood in the steps that follow.
Step 1: Buy The Backwood
Like regular cigars, Backwoods are available in a variety of flavors so choose your favorite.
Step 2: Gut the Backwood
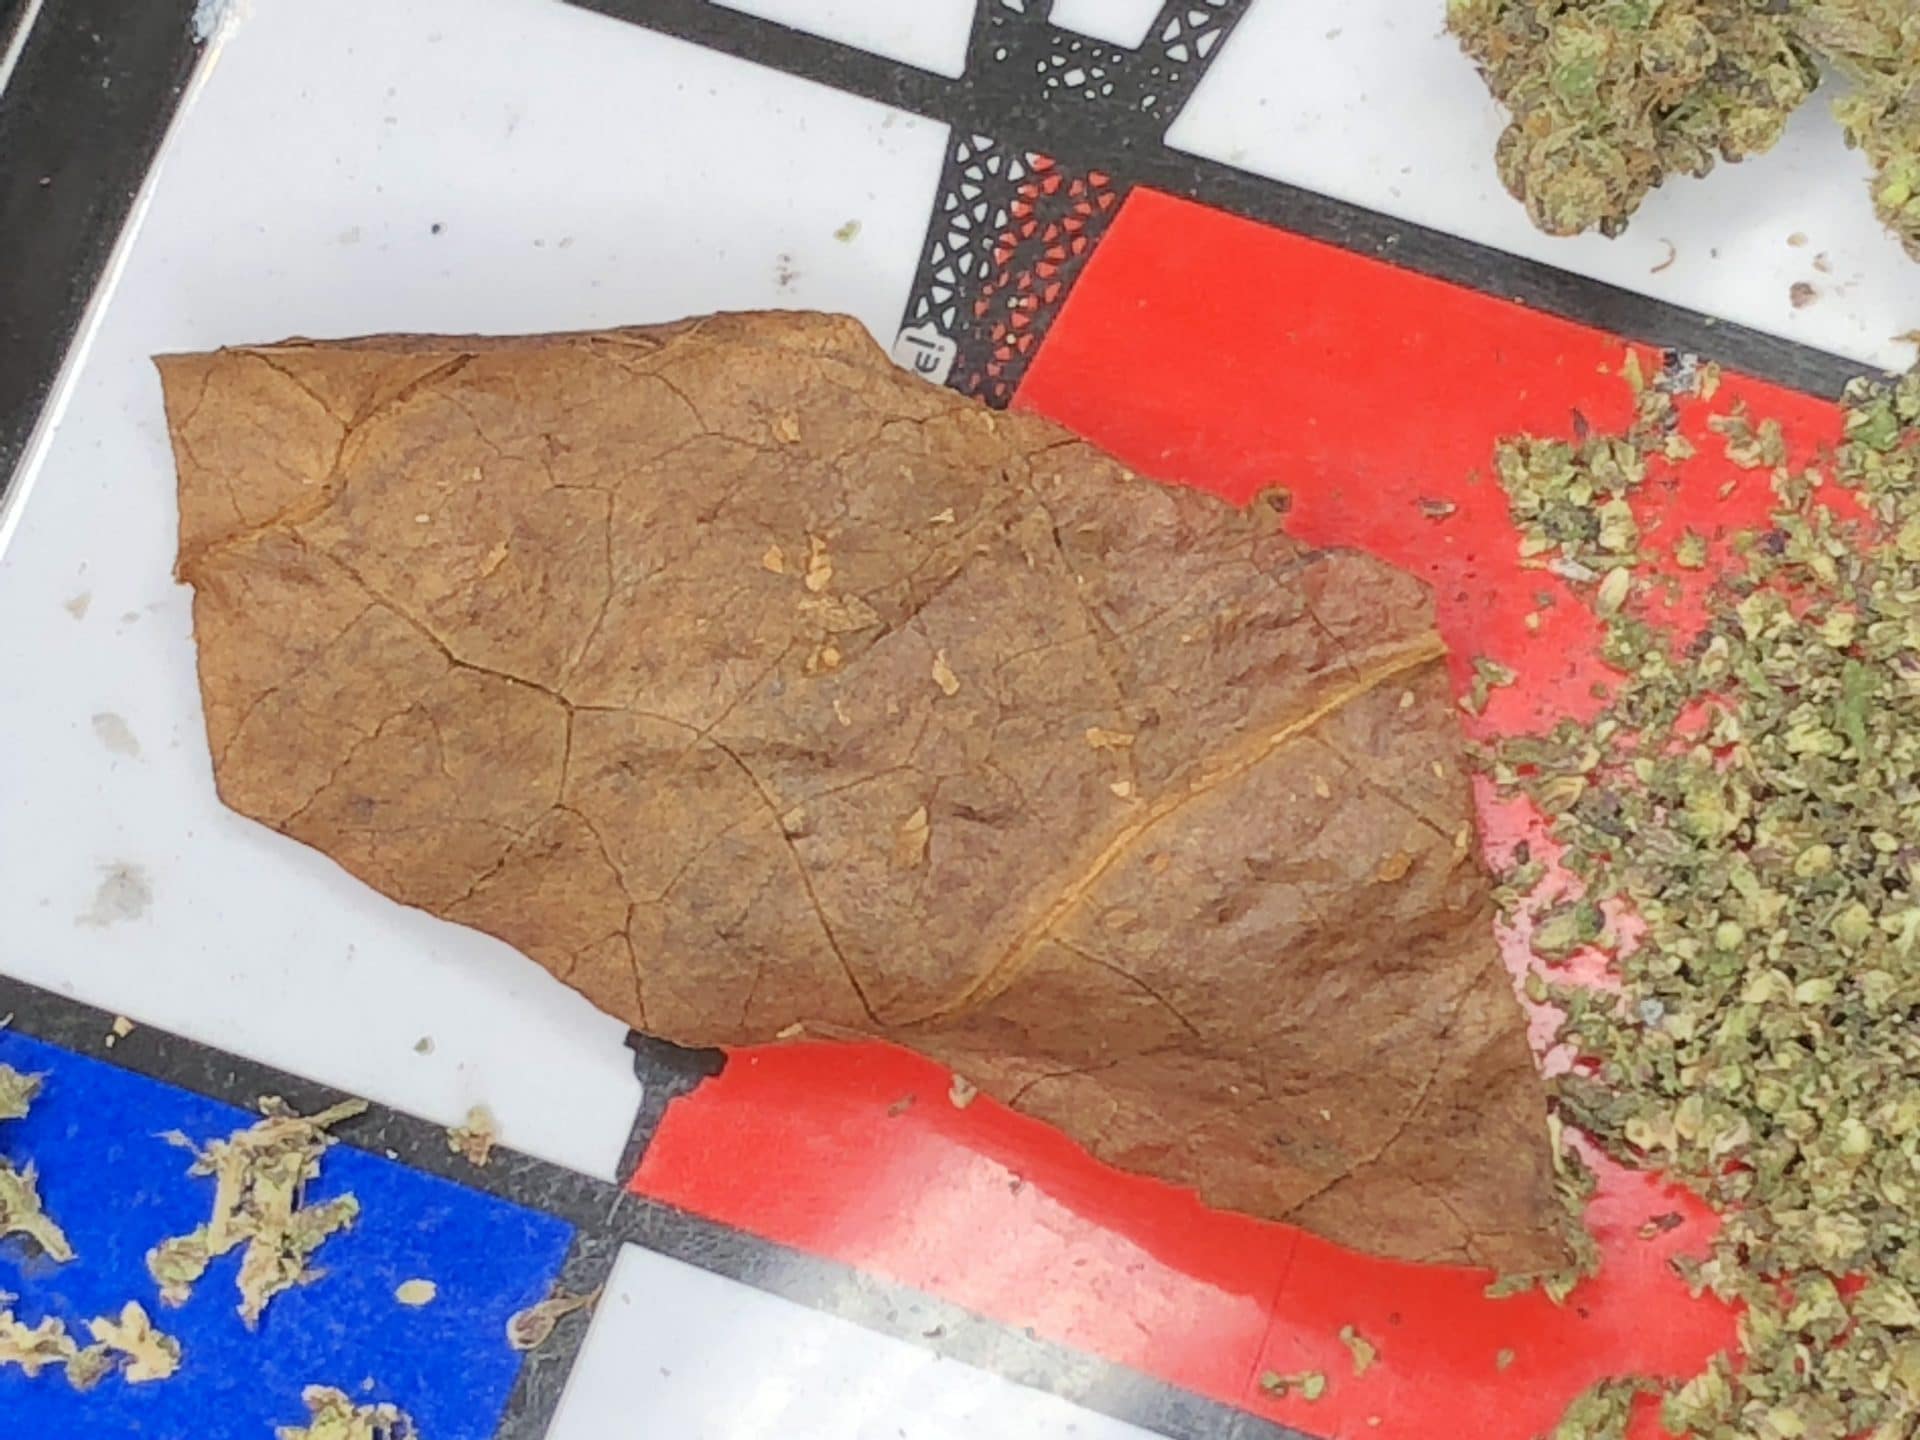
The gutting process is what makes backwoods different from other blunts. Backwoods are wrapped in raw tobacco leaf which makes them more fragile than other blunts. To unravel this product you will want to identify a fold seem that extends from the top of the cigar all the way down to the bottom.
Carefully pinch the seam and unroll the leaf carefully not to leave any tears Once the leaf has been unraveled you may then remove the tobacco.
Step 3: Grind the Bud
Next, you will want to grind the bud. As always make sure it is not too coarse or too fine. Once the weed has been properly ground you can load it up into the Backwood leaf.
Step 4: Rolling Your First Backwood
Up next you roll the Backwood using the index fingers and thumbs of both hands. You want to carefully roll and tuck the paper upwards. As you roll carefully apply pressure with your thumbs so that the cannabis stays within the wrap.
It is not uncommon for some bud to fall out during this part of the process. If this does happen, you can always funnel the bud back into the top once the roll has been completed.
Step 5: Lick & Seal
The leaf has now been rolled, but you still need to seal it. Lick gently along the folded seam the same you might with an envelope for best results.
Step 6: Smoking Your First Backwood
Let’s smoke that Backwood. It’s the same process as smoking any other rolled cannabis. However, you should bear in mind that the smoke will be slightly harsher and has higher nicotine content than even your average blunt.

This is because of the enhanced richness of the tobacco leaves. Because of this, beginners often shy away from Backwoods. However, if your lungs are properly prepared and you’re ready for a good buzz, Backwoods provide a flavor experience that just can’t be beaten.
Roll up, Puff, Pass & Enjoy!
Rolling joints and blunts can be very frustrating the first few times you attempt the feat. However, as you gain a little bit of experience you should quickly find that the steps sync into your muscle memory to the point that you can roll the perfect joint without even thinking about it.
You’ll probably find along the way that you develop your own rolling habits that are not strictly in line with the steps explained above.
The tips illustrated above are a great way to get your rolling skill to the next level but always feel free to get creative when you’re confident enough to experiment.

- Psilocybin Mushrooms in Colorado | Is It Legal & Where You Can Get Some - April 20, 2024
- Weed Measurements Guide: Marijuana Quantities, Weights & Prices - July 1, 2023
- Moldy Weed | Risks, Identification, and Smoking Safety - June 24, 2023